使用Hugo+LoveIt主题搭建博客
安装 Hugo
可参考Hugo 官方的 Quick Start
安装二进制(Mac)
 1
 2
 3
 4
 5
 6
 7
 8
 9
10
11
12
13
14
# 使用brew安装hugo
brew install hugo

# 创建新项目(网站)
hugo new site my_website

# 生成用于发布的静态文件(不包含草稿)
hugo

# 生成用于发布的静态文件(包括草稿)
hugo -D

# 本地运行网站
hugo server
直接使用 Docker
 1
 2
 3
 4
 5
 6
 7
 8
 9
10
11
12
13
14
15
16
17
18
19
20
21
22
# 创建新项目(网站)
docker run --rm -it \
$( pwd ) :/src \
\
# 生成用于发布的静态文件(不包含草稿)
docker run --rm -it \
$( pwd ) :/src \
# 生成用于发布的静态文件(包括草稿)
docker run --rm -it \
$( pwd ) :/src \
# 本地运行网站
docker run --rm -it \
$( pwd ) :/src \
\
\
1
2
3
4
# 比如
docker run --rm -it \
$( pwd ) :/src \
安装 LoveIt 主题
1
2
# 位于你的博客项目根目录
git clone https://github.com/dillonzq/LoveIt.git themes/LoveIt
代码克隆成功后在./themes文件夹下应出现LoveIt文件夹。
项目文件树结构
 1
 2
 3
 4
 5
 6
 7
 8
 9
10
.
├── archetypes # markdown文章的模版
├── config.toml # 配置文件
├── content # 网站内容,主要保存文章
├── data # 生成网站可用的数据文件,可用在模版中
├── layouts # 生成网站时可用的模版
├── public # 通过hugo命令生成的静态文件,主要发布这个
├── resources # 通过hugo命令一起生成的资源文件,暂时不知道什么用
├── static # 静态文件,比如文章中的图片/视频文件、缩略图等
└── themes # 保存可用的hugo主题
通常,我们只会用到以下几个文件夹的东西
config.toml :保存 hugo 的配置,包括主题的配置等。详细设置见下方 #网站配置content:保存网站的各种内容,比如文章。archetypes: 保存文章的 markdown 模版,通常包括文章的前缀注释,是一些在创建新文章时会被用到。static :保存文章中用到的静态文件,比如图片、网站缩略图等。public :通过hugo命令生成的静态 html 文件、css、js 等。在服务器上发布时主要发布这个文件夹。
配置网站设置
配置文件位置:./config.toml
配置缩略图
使用的网站:https://realfavicongenerator.net/ 获取缩略图的各种格式
下载到的全部内容
将整个压缩包的文件(包括图片之外的文件)放到./static下
重启浏览器,应该可以看到标签上的缩略图出现了。
浏览器标签出现缩略图
缩略图未生效的原因可能是浏览器使用了之前的缓存。尝试:
彻底关闭并重启浏览器。
通过这个步骤 强制删除缓存。
强制 Chrome 禁用网页缓存。
打开 Chrome 开发者工具。(网页空白处右键-检查,或者按 F12)
在Network栏勾选Disable cache。
或者在设置里找到Preferences -> Network -> Disable cache
开始写第一篇文章
文章前缀参数
在每篇 markdown 文章最前面可以用一部分注释来告诉LoveIt主题,这篇文章的属性,譬如文章标签、分类、是否为草稿等。
将文章前缀参数保存在 markdown 模版中
模版文件位置:./archetypes/default.md
 1
 2
 3
 4
 5
 6
 7
 8
 9
10
11
12
13
14
15
16
17
---
title: "{{ replace .TranslationBaseName "-" " " | title }}"
subtitle: ""
date: {{ .Date }}
draft: true
tags: []
categories: []
hiddenFromHomePage: false
hiddenFromSearch: false
featuredImage: ""
featuredImagePreview: ""
license: '< a rel = "license external nofollow noopener noreffer" href = "https://creativecommons.org/licenses/by-nc/4.0/" target = "_blank" > CC BY-NC 4.0</ a > '
---
生成新文章
生成新文章的命令:
执行完成后,在./content/posts目录下应该可以看到新文件,同时里面已经有 markdown 模版中的文章前缀参数。
本地调试
本地调试命令:
1
hugo server --disableFastRender
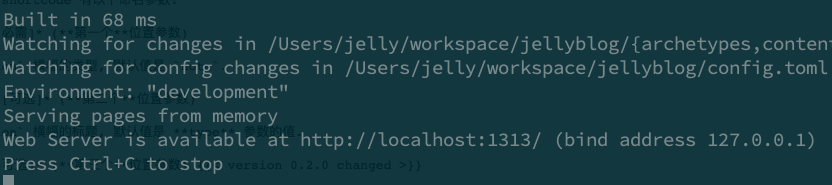
本地运行网站
出现成功的提示后在浏览器打开http://localhost:1313即可看到网站。
如果你看到如图的编译错误,可能是因为你的文章除了前缀参数外没有任何内容。随便写几句话就可以解决这个问题。
有文章为空时的编译报错
创建 Github 仓库
个人建议创建两个仓库:
第一个仓库
按照常规方式创建仓库即可,反正设置为private 权限等级,也没人看得见。
第一个仓库示例,保存博客源代码
链接本地仓库与远端仓库
 1
 2
 3
 4
 5
 6
 7
 8
 9
10
11
12
13
## 位于博客源代码根目录
## 初始化本地Git仓库
git init
## 设置名为Origin的远端Git仓库
git remote add origin {{ 这里替换成你的仓库在Github Clone用的地址}}
## 选择所有文件
git add -A
## Push到github
git push -u origin master
创建.gitignore
在源代码项目中创建.gitignore文件,来防止把生成的静态文件上传。创建位置如下:
 1
 2
 3
 4
 5
 6
 7
 8
 9
10
11
12
13
14
.
├── .git
├── .github
├── .gitignore <---- 在根目录下
├── README.md
├── archetypes
├── config.toml
├── content
├── data
├── layouts
├── public
├── resources
├── static
└── themes
在.gitignore中写入/public,来防止 Git 将其上传。
1
2
3
4
cat .gitignore
## 输出
/public
第二个仓库
创建仓库,注意名称
第二个仓库名字比较重要,必须是{{你的github用户名}}.github.io。
比如我的 Github 名字为JellyZhang,那么我需要创建的仓库名称为JellyZhang.github.io,如图所示。
第二个仓库示例(注意仓库名称与自己用户名对应)
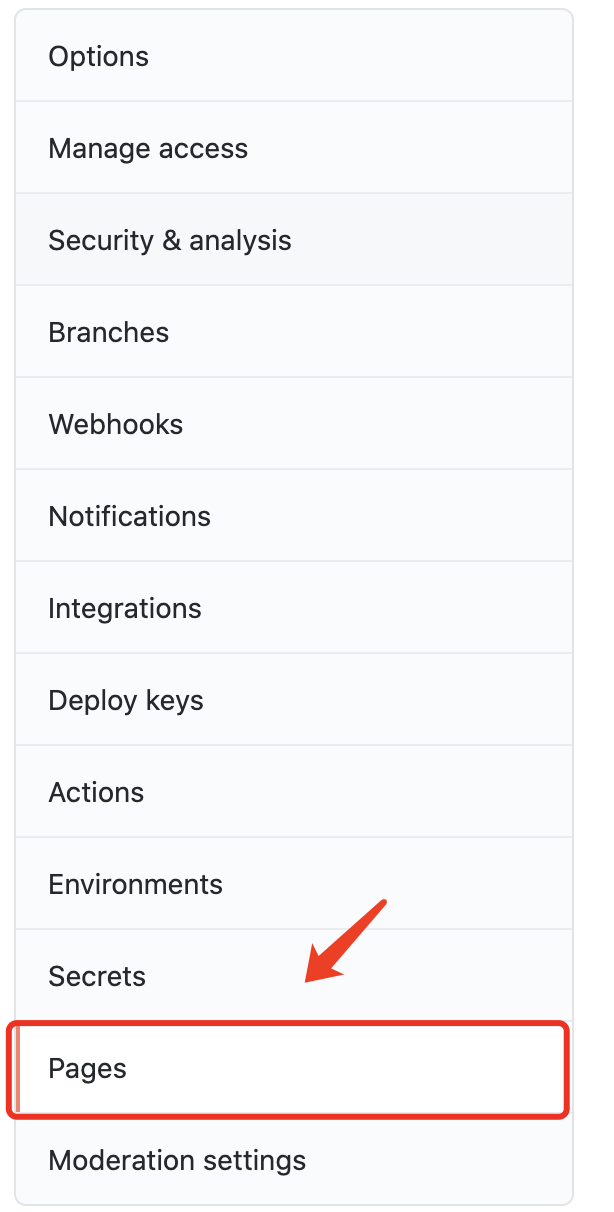
在仓库设置里设置启用Github Pages
找到仓库设置
找到Pages一栏
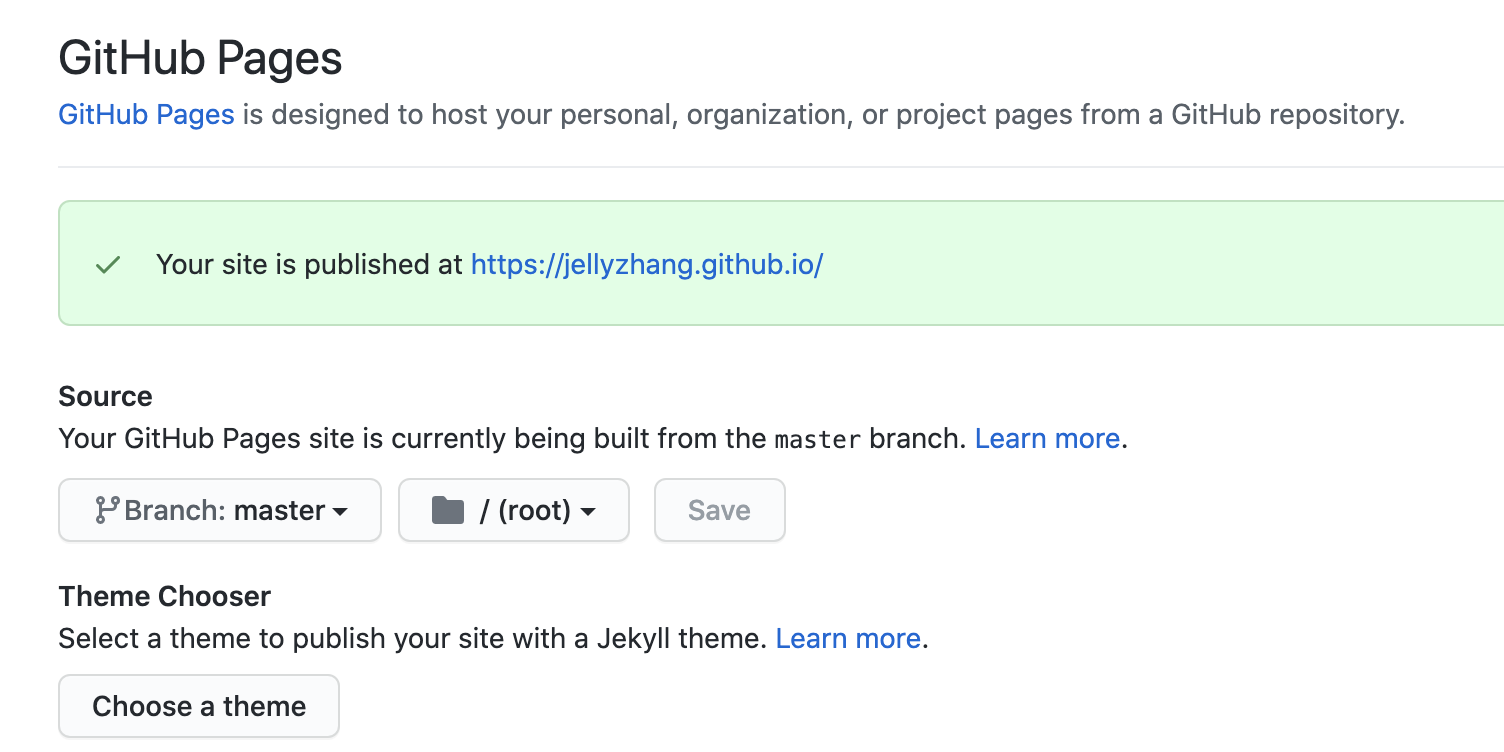
设置Branch与静态文件位置
这个地方设置Branch为master,静态文件位置为/(root),原因是我们在下个步骤中会直接将生成的public文件夹中的内容push到master分支的/目录下。
给源代码仓库添加 Github Action
创建 CI 脚本
Github Action 是 Github 提供的 CI 系统,可以让用户编写脚本,并在触发指定的操作后(比如新 commit push 到仓库),自动触发脚本。它可以:
编译项目
测试项目
登陆远程服务器
发布服务
等等……
在源代码项目根目录下新建.github/workflow/main.yml。(通过 Github Action 网页端操作也可以)
 1
 2
 3
 4
 5
 6
 7
 8
 9
10
11
12
13
14
15
16
.
├── .git
├── .github
│ └── workflows
│ └── main.yml <---在这里创建
├── .gitignore
├── README.md
├── archetypes
├── config.toml
├── content
├── data
├── layouts
├── public
├── resources
├── static
└── themes
main.yml脚本内容:
1
2
3
4
5
6
7
8
9
10
11
12
13
14
15
16
17
18
19
20
21
22
23
24
25
26
27
28
29
30
31
32
33
34
35
36
37
38
39
40
41
42
43
44
45
46
47
48
49
50
51
52
# This is a basic workflow to help you get started with Actions
name : CI
# Controls when the action will run.
on :
# Triggers the workflow on push or pull request events but only for the master branch
push :
branches : [ master]
pull_request :
branches : [ master]
# Allows you to run this workflow manually from the Actions tab
workflow_dispatch :
# A workflow run is made up of one or more jobs that can run sequentially or in parallel
jobs :
# This workflow contains a single job called "build"
build :
# The type of runner that the job will run on
runs-on : ubuntu-latest
# Steps represent a sequence of tasks that will be executed as part of the job
steps :
# Checks-out your repository under $GITHUB_WORKSPACE, so your job can access it
- uses : actions/checkout@v2
with :
submodules : true # Fetch Hugo themes (true OR recursive)
fetch-depth : 0 # Fetch all history for .GitInfo and .Lastmod
- name : Hugo setup
# You may pin to the exact commit or the version.
# uses: peaceiris/actions-hugo@2e89aa66d0093e4cd14751b3028fc1a179452c2e
uses : peaceiris/actions-hugo@v2.4.13
with :
# The Hugo version to download (if necessary) and use. Example: 0.58.2
hugo-version : latest # optional, default is latest
# Download (if necessary) and use Hugo extended version. Example: true
extended : true # optional, default is false
- name : Build
run : hugo
- name : Pushes to another repository
uses : cpina/github-action-push-to-another-repository@master
env :
API_TOKEN_GITHUB : ${{ secrets.API_TOKEN_GITHUB }}
with :
source-directory : "public"
destination-github-username : "这里输入你的Github用户名"
destination-repository-name : "这里输入你的Github用户名.github.io"
user-email : 这里输入你的Github邮箱
注意on里的 branch 是否和自己的相同,因为现在 Github 默认分支为 main。
同时最后三行内容需要自行替换。
脚本主要做了以下事情:
创建一个 Hugo 环境
使用 hugo 命令编译代码,产生 public 文件夹
将 public 文件 push 到你的Github用户名.github.io仓库。(也就是你之前创建的第二个仓库)
设置 Push 用的密钥
为了让 Github Action 脚本有权限将代码 Push 到我们的xx.github.io仓库,我们需要申请一个密钥并告诉它。在 Github 设置中找到Developer settings/Personal access tokens
个人密钥设置界面
新建一个密钥,权限设置把Repo打勾。
新建密钥
回到第一个仓库的设置里,选择Secrets(密钥)
仓库密钥设置
新建密钥,将刚才生成的个人密钥填进去,名字设为API_TOKEN_GITHUB(跟 CI 脚本里的名称对应即可)
新建仓库密钥
观察效果
在 Push 新修改到第一个仓库后,在Action界面可以看到新的workflow开始运行了。
第一个仓库workflow界面(图中已经完成)
在workflow结束后,可以在第二个仓库看到新的Push
第二个仓库自动push了新的静态页面
在等待 1-2 分钟后,即可在xx.github.io观察到变化。
配置评论系统
GitTalk
GitTalk是基于 github 的 repo issues 作为数据库来存储评论的。
Love-It主题集成了GitTalk ,需要使用的话只需要在config.toml里填写指定信息就可以了。
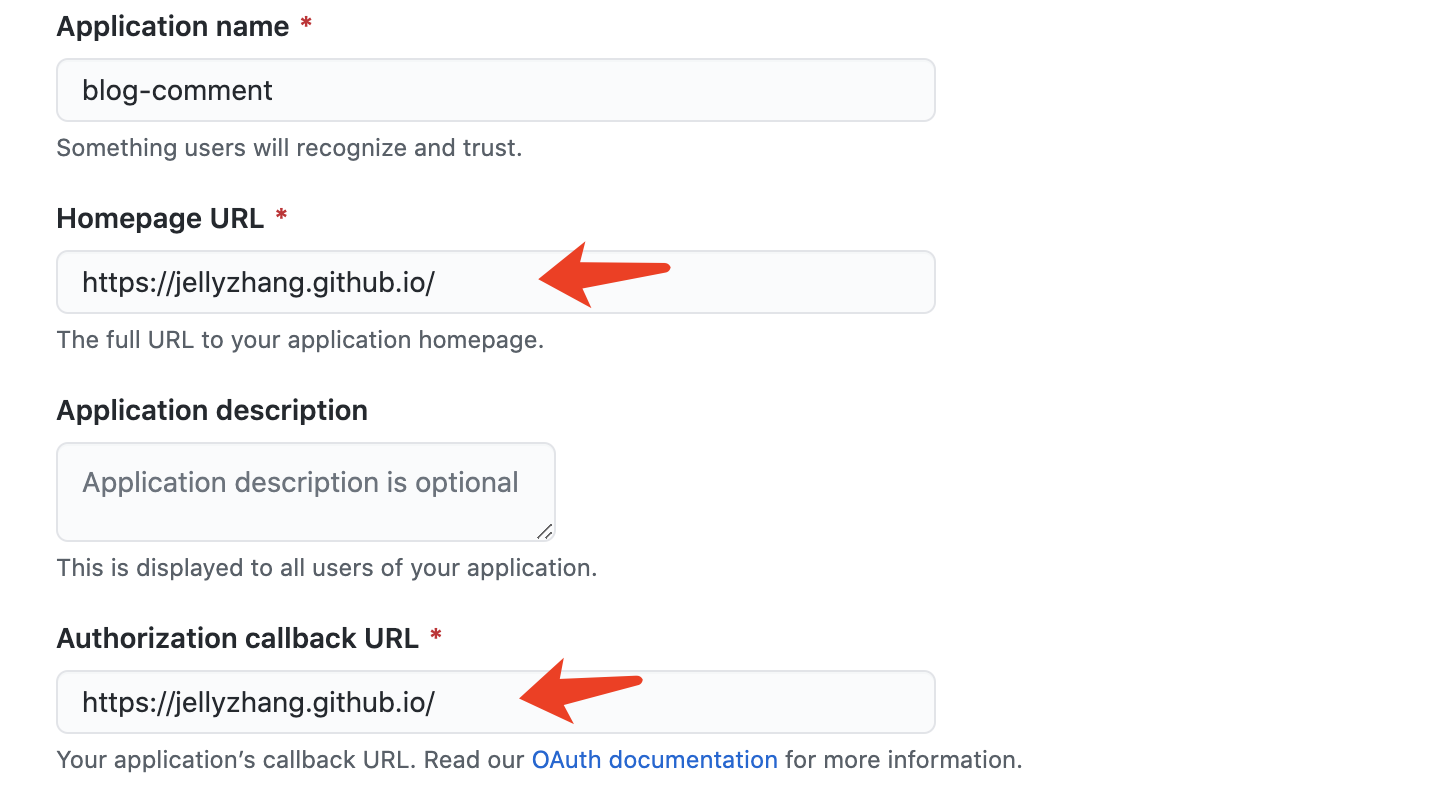
首先要去Github -> Settings -> Developer Settings -> OAuth App 里注册一个新的 OAuth App 来给 Gitalk 使用。
两个 Url 填自己博客的地址就行。
注册OAuth App
修改config.toml:
1
2
3
4
5
6
7
8
9
10
11
12
13
[ params . page . comment ]
enable = true < -- 启用评论系统
...
[ params . page . comment . gitalk ]
enable = true
owner = "JellyZhang" < -- Github 用户名
repo = "blog-comment" < -- 用来存放评论的 repo 名称
clientId = "" < -- 申请好的 OAuth 的 ClientId
clientSecret = "" < -- 申请好的 OAuth 的 ClientSecret
Gitalk 1.6.2版本 存在一个自身 Bug,它里面用到了一个链接来依赖某个下游,而事实上这个链接是 demo 演示用的,已经因为滥用被取消了,所以需要将 LoveIt 主题使用的 1.6.2 版本改成1.7.2
修改./themes/LoveIt/assets/data/cdn/jsdelivr.yml中的Gitalk的链接:
1
2
3
4
5
6
7
8
9
...
metingJS : meting@2.0.1/dist/Meting.min.js
# gitalk@1.6.2 https://github.com/gitalk/gitalk
gitalkCSS : gitalk@1.7.2/dist/gitalk.min.css <-- 改为1.7.2
gitalkJS : gitalk@1.7.2/dist/gitalk.min.js <-- 改为1.7.2
# valine@1.4.14 https://valine.js.org/
valineJS : valine@1.4.14/dist/Valine.min.js
...
评论系统在本地运行时不生效,需要 publish 后查看效果。
配置搜索系统
LoveIt集成了两种搜索引擎,Lunr 和algolia 。
参考LoveIt 官方文档
lunr: 简单, 无需同步 index.json, 没有 contentLength 的限制, 但占用带宽大且性能低 (特别是中文需要一个较大的分词依赖库)
algolia: 高性能并且占用带宽低, 但需要同步 index.json 且有 contentLength 的限制
我这里记录algolia的配置方法。
首先需要在配置文件中新增Outputs的JSON类型,用于产生index.json文件来提供给搜索引擎。
1
2
3
4
5
config . toml :
[ outputs ]
home = [ "HTML" , "RSS" , "JSON" ]
设置后,在使用hugo命令编译后应该可以在public文件夹下找到index.json
之后在algolia注册账号并创建一个application与index:
创建application, freePlan一般够用
然后在API Keys里找到appID和searchKey:
在API Keys里找到appId与searchKey
 1
 2
 3
 4
 5
 6
 7
 8
 9
10
11
12
13
14
15
16
17
18
19
20
21
22
23
config . toml :
[ languages . zh-cn . params . search ]
enable = true
# 搜索引擎的类型 ("lunr", "algolia")
type = "algolia"
# 文章内容最长索引长度
contentLength = 4000
# 搜索框的占位提示语
placeholder = ""
# 最大结果数目
maxResultLength = 10
# 结果内容片段长度
snippetLength = 50
# 搜索结果中高亮部分的 HTML 标签
highlightTag = "em"
# 是否在搜索索引中使用基于 baseURL 的绝对路径
absoluteURL = false
[ languages . zh-cn . params . search . algolia ]
index = "" < --- 你创建的 index 的名字
appID = "" < --- Application ID
searchKey = "" < --- Search-Only API Key
然后可以上传生成的index.json到 algolia 来生成索引,实现搜索功能。
手动上传index.json的方法
当然,每次生成完上传index.json未免太过麻烦,况且我们还是用Github Action来自动编译的,因此接下来我们让Github Action来帮我们上传index.json到algolia。
首先生成一个 Admin API Key 用于调用 API 来上传 index.json:
生成Admin API Key
然后修改我们的Github Action的脚本:
 1
 2
 3
 4
 5
 6
 7
 8
 9
10
11
12
13
14
15
16
在`main.yml`末尾加上:
- name : Algolia Index Uploader
# You may pin to the exact commit or the version.
# uses: rxrw/algolia-index-uploader@294d1d600c4a2197a64903b6161cc80acea1becb
uses : rxrw/algolia-index-uploader@v1
with :
# Your Algolia IndexPath
index_path : public/index.json <-- 生成的index.json位置,默认即可
# Algolia Index Id
algolia_index_id : XXXXXXXXX <-- 你的indexId, 即之前获得的`application ID`
# Algolia Index Name
algolia_index_name : XXXX <--- 你创建的index名字
# Algolia Admin Key
algolia_index_admin_key : XXXXXXXXXXXX <--- 上图中获取的admin Key
之后运行脚本即可在algolia在 dashboard 里看到新增的记录。
algolia新增了record
每次上传的记录是增量的,意味着不会清除旧的记录。
因此如果删除了发布过的旧文章,需要手动去algolia网站上清理相关的 Object。(也可以使用 Clear 功能全部清除)
配置 Google Analytics 网站分析
Google analytics是将用户的动作行为收集后发送到 Google,交由 Google 进行统计与分析,形成看板。
在Google analytics 创建媒体资源 –> 添加数据流 –> 网站,之后在数据流详情里获取到衡量ID:
获取衡量ID
之后可以在Dashboard里查看网站的用户行为,有很多内容可以慢慢探索。
Google analytics Dashboard
配置 Google Search Console
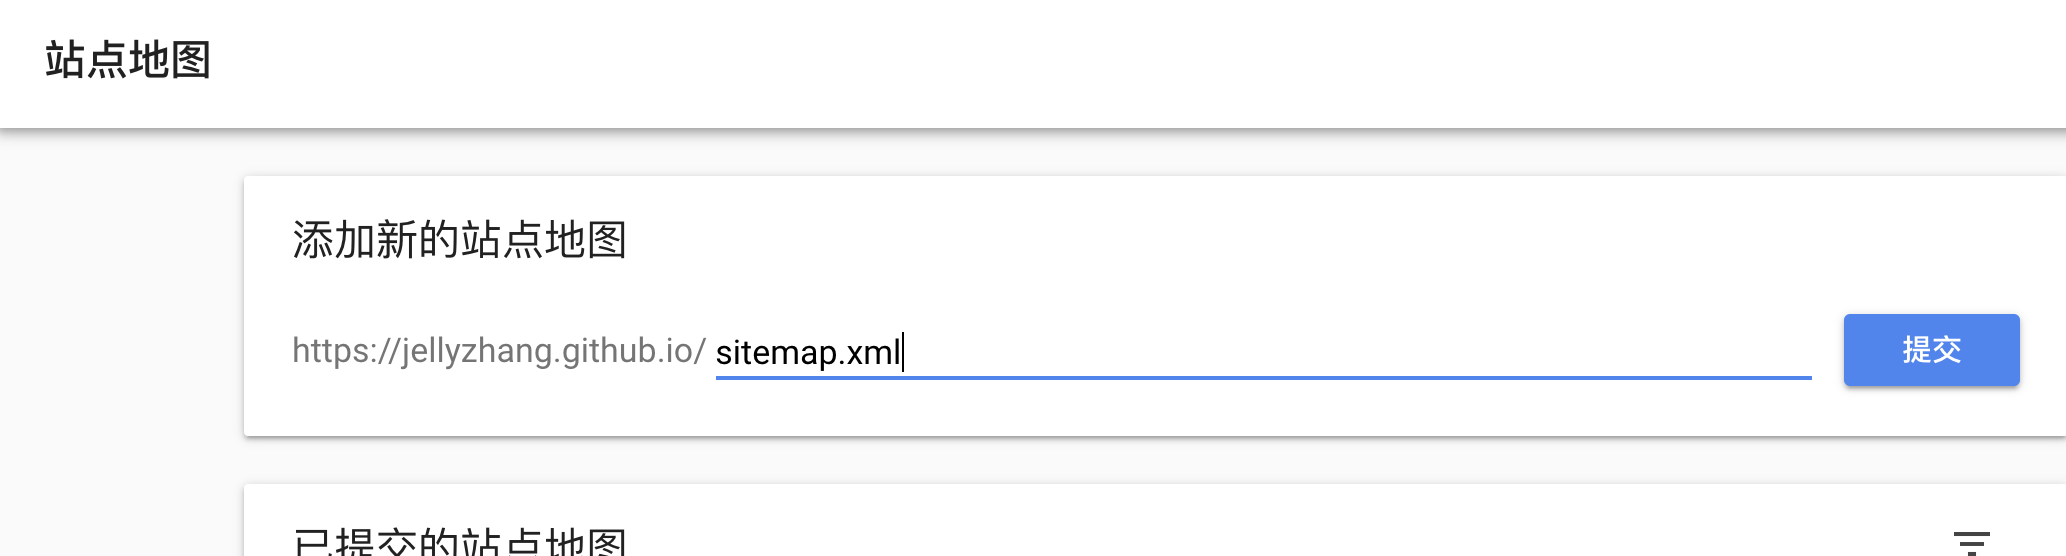
首先确定自己的站点地图有正常生成。打开/sitemap.xml链接:
sitemap
之后在Google Search Console里填写自己站点地图的链接,可以帮助谷歌爬虫了解网站结构。
上传sitemap
参考文献
LoveIt 官方文档 Hugo 官方文档 刷新 Chrome 缓存