一、高级接口
多线程启动函数std::async()
- async()的作用在于将其获取到的函数立即在一个新的线程内进行异步启动。也就是一个线程启动函数。其形式如下:
1
|
std::async(func1) //无参数形式
|
- 向async()传递启动函数,并且传入启动函数的参数:
1
2
3
4
5
6
7
|
void func1(int arg1,int arg2)
{
    std::cout<<arg1<<std::endl;
    std::cout<<arg2<<std::endl;
}

std::async(func1,arg1,arg2) //向函数func1传递arg1,arg2;
|
线程返回结果std::future
- std::async()会返回一个std::future object类型的返回值,在std::future object中,我们可以取得线程返回值或异常信息。此外,std::future object类型的特化与线程函数的返回值一致。形式如下:
 1
 2
 3
 4
 5
 6
 7
 8
 9
10
11
12
|
void func1(int A = 0);
int func2();


int main()
{
	std::future<void> func1_res(std::async(print_A,10));
    //func1返回类型为void,future object的类型也为void

	std::future<int> func2_res(std::async(print_B));
    //func2返回类型为int,future object的类型也为int
}
|
-
指定std::async()的发射策略(launch strategy)
std::async的策略主要有两个:
- std::launch::async : 立即尝试启动异步调用,如果在此处无法进行调用时,会返回一个std::system_error
- std::launch::deferred : 延缓线程的启动,直到我们手动调用future::get()时,线程才会启动。
示例如下:
 1
 2
 3
 4
 5
 6
 7
 8
 9
10
11
12
13
14
15
16
17
18
19
20
21
22
23
24
25
26
|
#include <future>
#include <ctime>
#include <iostream>
#include <Windows.h>

void func1()
{
	std::cout << "func1 start!" << std::endl;
}
void func2()
{
	std::cout << "func2 start!" << std::endl;
}

int main()
{
    //f1在这里就启动了,输出func1 start!
	std::future<void> f1(std::async(std::launch::async, func1));
    //f2在这里由于发射策略的原因,并没有启动
	std::future<void> f2(std::async(std::launch::deferred, func2));
	Sleep(3000);
	std::cout << "3 seconds later!" << std::endl;
    //三秒之后,由于调用future::get(),线程f2启动,输出func2 start!
	f2.get();
	return 0;
}
|
共享变量std::shared_future
shared_future 简单说来,其实就是一个可以多次调用 其成员函数get()的object。
由于std::future的成员函数get()只能够调用一次,第二次调用的时候会出现不可预期的行为(实际上就会报错或者完全不会有任何动作)。但是,很多时候,我们希望一个线程可以被多个线程利用,这个时候,std::share_future就横空出世了!
 1
 2
 3
 4
 5
 6
 7
 8
 9
10
11
12
13
14
15
16
17
18
19
20
21
22
23
24
25
26
27
28
29
30
31
32
33
34
35
36
37
38
39
|
#include <future>
#include <iostream>
#include <string>
#include <thread>
#include <stdexcept>
#include <exception>

using namespace std;
int func1()
{
	std::cout << "Read Number: ";
	int num;

	std::cin >> num;
	if (!std::cin)
	{
		throw runtime_error("no number read");
	}
	return num;
}


void addOne(std::shared_future<int> SfObject)
{
	int num = SfObject.get();
	num += 1;
	std::cout << num << std::endl;
}

int main()
{
	std::shared_future<int> f = std::async(func1);
	auto f1 = std::async(addOne, f);
	auto f2 = std::async(addOne, f);

	f1.get();
	f2.get();
	return 0;
}
|
可以看到上面这段代码中,std::shared_future f 的成员函数 std::get()被多次调用。假如我们将share_future object 换为futureobject时,甚至无法通过编译。
二、低级接口
多线程启动函数Class std::thread
Class std::thread的调用接口与std::async()颇为显示,一起看一下下面这个实例:
 1
 2
 3
 4
 5
 6
 7
 8
 9
10
11
12
13
14
15
16
17
18
19
20
|
#include <iostream>
#include <thread>


void Print(int num)
{
	std::cout << "this is thread: "<< num << std::endl;
}


int main()
{

	std::thread t1(Print, 1); //创建线程1
	std::thread t2(Print, 2); //创建线程2
	t1.join(); //等待线程1结束
	t2.join(); //等待线程2结束
	std::cout << "this is  main thread "<< std::endl;
	return 0;
}
|
可以看到,在线程创建和传参上,Class thread 和 std::async()的手法都颇为类似。只不过一个是类,一个是函数。
但是,两者也有颇多地方有较大差异:
1、Class thread 没有发射策略,只要我们实例化Class thread的对象,系统就会尝试启动目标函数,如果无法启动目标函数,就会抛出std::system_error并携带差错码resource_unavailable_try_again。
2、Class thread并不提供处理线程结果的接口
3、必须对线程的状态进行声明,等待其结束(join())或直接卸载(detach())
4、如果main()函数结束了,所有线程会被直接终止
线程返回结果std::promise
待补充。。
线程池Class packaged_task
Class packaged_task实现了运行我们自由控制启动线程的启动时间,可以用于实现线程池。
让我们直接来看一个例子吧:
 1
 2
 3
 4
 5
 6
 7
 8
 9
10
11
12
13
14
15
16
17
18
19
20
21
|
#include <iostream>
#include <thread>
#include <string>
#include <chrono>
#include <future>
#include <Windows.h>

void func1()
{
	std::cout << "creating thread……" << std::endl;
}


int main()
{
	std::packaged_task<void()> task(func1);  //这里创建thread task,但是不会立即启动线程
	std::cout << "Sleep for 3 seconds" << std::endl;
	Sleep(3000); //sleep3秒,当然,这里可以改成任何你需要的操作
	task(); //3秒后启动线程
	return 0;
}
|
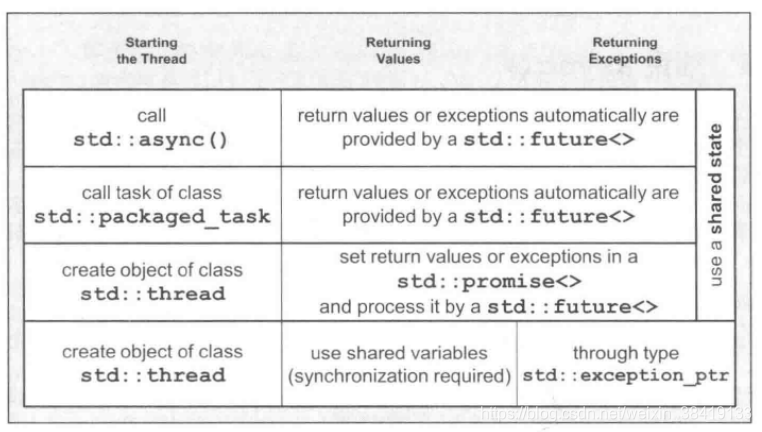
好的到目前为止,关于线程的启动和创建过程的内容到这里就基本结束了,接下来,我们以一张图作为这部分的结束。
![https://img-blog.csdnimg.cn/20191105112247608.png?x-oss-process=image/watermark,type_ZmFuZ3poZW5naGVpdGk,shadow_10,text_aHR0cHM6Ly9ibG9nLmNzZG4ubmV0L3dlaXhpbl8zODQxOTEzMw==,size_16,color_FFFFFF,t_70 https://img-blog.csdnimg.cn/20191105112247608.png?x-oss-process=image/watermark,type_ZmFuZ3poZW5naGVpdGk,shadow_10,text_aHR0cHM6Ly9ibG9nLmNzZG4ubmV0L3dlaXhpbl8zODQxOTEzMw==,size_16,color_FFFFFF,t_70]()
(图源:《C++标准库》(侯捷译)
三、互斥量与锁(Mutex & Lock)
首先,我们得先理解为什么会出现互斥量这种需求。其实,在上面,有一段代码是在线程中输出一段字符串,我们看看看到,由于线程的启动都是同时的,所以两个不同的线程会同时对一个命令窗口输出字符,这样就会导致一种不可预计的情况,如图:
![https://img-blog.csdnimg.cn/20191105113632179.png https://img-blog.csdnimg.cn/20191105113632179.png]()
可以看到,字符的输出并没有按照我们的预期。那么,当我们有一个变量mutex,同时在多个线程中会被使用,其中线程A在线程B对mutex进行修改的过程中,同时又对mutex进行修改,那么,不可预期的事情便会发生。
所以,我们需要互斥量的出现。同时,我们需要对会被多个线程调用的变量的修改过程进行上锁(Lock),保证上锁过程中线程对资源的独占,才能避免多线程同时对某个变量进行修改,而导致不可预期的事情发生。
还是以上面的字符输出代码为例,我们要怎么修改才能得到我们预期的输出呢? 答案很简单,那就是对字符输出的过程进行上锁(lock),输出结束时解锁(unlock)。看代码吧!
 1
 2
 3
 4
 5
 6
 7
 8
 9
10
11
12
13
14
15
16
17
18
19
20
21
22
23
24
|
#include <iostream>
#include <thread>
#include <mutex>

std::mutex mut;//声明互斥量

void Print(int num)
{
	mut.lock();//对输出过程进行上锁
	std::cout << "this is thread: "<< num << std::endl;
	mut.unlock();//解锁
}


int main()
{

	std::thread t1(Print, 1);
	std::thread t2(Print, 2);
	t1.join();
	t2.join();
	std::cout << "this is  main thread "<< std::endl;
	return 0;
}
|
这样修改之后,就能得到我们想要得到的输出效果:
![https://cdn.jsdelivr.net/gh/xinqinew/pic@main/img/20191105114816991.png https://cdn.jsdelivr.net/gh/xinqinew/pic@main/img/20191105114816991.png]()
![https://cdn.jsdelivr.net/gh/xinqinew/pic@main/img/20191105134003784.png https://cdn.jsdelivr.net/gh/xinqinew/pic@main/img/20191105134003784.png]()
就是这样,我们对多线程处理的公共部分,进行上锁,使得线程独占资源,便可以使得资源在线程修改的这段时间内不被别的线程使用。但是,随着应用锁(Lock)的场景越来越多,我们也有了更多不同的需求,所以就发展出了各种不同的锁。同时也会出现一些问题。
![https://cdn.jsdelivr.net/gh/xinqinew/pic@main/img/watermark,type_ZmFuZ3poZW5naGVpdGk,shadow_10,text_aHR0cHM6Ly9ibG9nLmNzZG4ubmV0L3dlaXhpbl8zODQxOTEzMw==,size_16,color_FFFFFF,t_70.png https://cdn.jsdelivr.net/gh/xinqinew/pic@main/img/watermark,type_ZmFuZ3poZW5naGVpdGk,shadow_10,text_aHR0cHM6Ly9ibG9nLmNzZG4ubmV0L3dlaXhpbl8zODQxOTEzMw==,size_16,color_FFFFFF,t_70.png]()
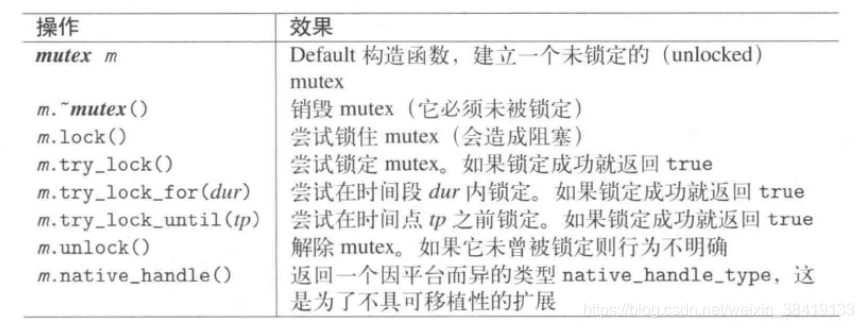
(各种Mutex及其功能)
![https://cdn.jsdelivr.net/gh/xinqinew/pic@main/img/watermark,type_ZmFuZ3poZW5naGVpdGk,shadow_10,text_aHR0cHM6Ly9ibG9nLmNzZG4ubmV0L3dlaXhpbl8zODQxOTEzMw==,size_16,color_FFFFFF,t_70-20220428220010623.png https://cdn.jsdelivr.net/gh/xinqinew/pic@main/img/watermark,type_ZmFuZ3poZW5naGVpdGk,shadow_10,text_aHR0cHM6Ly9ibG9nLmNzZG4ubmV0L3dlaXhpbl8zODQxOTEzMw==,size_16,color_FFFFFF,t_70-20220428220010623.png]()
(Mutex Class 的操作函数)
接下来我们讲一下几个重要的Lock的方式
1、Class lock_guard
最简单的锁形式就是Mutex.Lock(),这个方法简单好用,但是有很多时候,人们会忘记将其解锁(Mutex.unlock()),所以出现了lock_guard的这种自动解锁的方法。Class lock_guard是在声明时,自动上锁,在离开作用域之后自动析构解锁。
我们看一下接口:
![https://cdn.jsdelivr.net/gh/xinqinew/pic@main/img/20191105135807117.png https://cdn.jsdelivr.net/gh/xinqinew/pic@main/img/20191105135807117.png]()
 1
 2
 3
 4
 5
 6
 7
 8
 9
10
11
12
13
14
15
16
17
18
19
20
21
22
23
24
25
26
|
#include <iostream>
#include <thread>
#include <mutex>

std::mutex mut;

void Print(int num)
{
	std::cout << "this is thread_unlock: " <<num<< std::endl;//未上锁
	{
		std::lock_guard<std::mutex> lg(mut);//上锁
		std::cout << "this is thread: " << num << std::endl;
	}//超出作用域,自动解锁
}


int main()
{

	std::thread t1(Print, 1);
	std::thread t2(Print, 2);
	t1.join();
	t2.join();
	std::cout << "this is  main thread " << std::endl;
	return 0;
}
|
上面的代码在没有上锁的字符输出过程中就串行了。
2、Class unique_lock
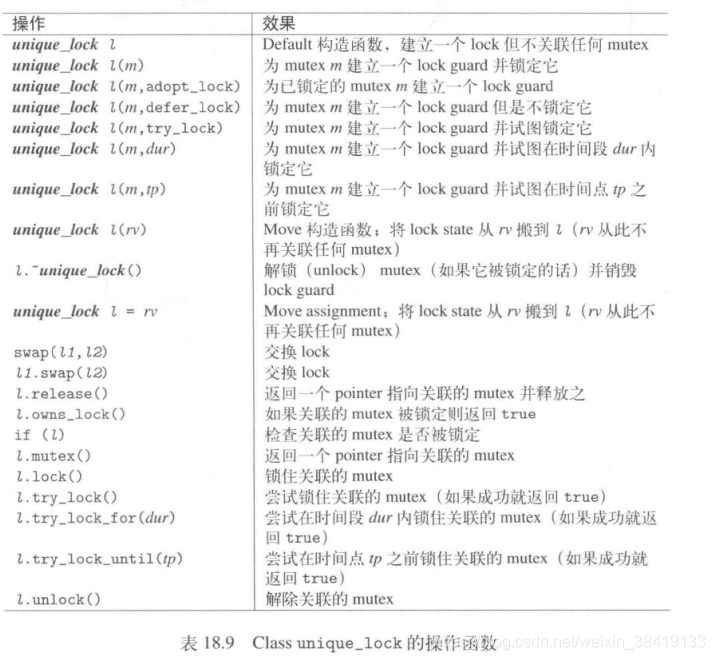
相对于Class lock_guard 来说,Class unique_lock 的特殊之处在于,可以让我们指定“何时”以及“如何”锁定和结果Mutex,此外,在Class unique_lock中,我们甚至可以用owns_lock()或bool()来查询目前Mutex是否会被锁住。
![https://cdn.jsdelivr.net/gh/xinqinew/pic@main/img/watermark,type_ZmFuZ3poZW5naGVpdGk,shadow_10,text_aHR0cHM6Ly9ibG9nLmNzZG4ubmV0L3dlaXhpbl8zODQxOTEzMw==,size_16,color_FFFFFF,t_70-20220428220010794.png https://cdn.jsdelivr.net/gh/xinqinew/pic@main/img/watermark,type_ZmFuZ3poZW5naGVpdGk,shadow_10,text_aHR0cHM6Ly9ibG9nLmNzZG4ubmV0L3dlaXhpbl8zODQxOTEzMw==,size_16,color_FFFFFF,t_70-20220428220010794.png]()
四、条件变量(Condition Variable)
在多线程的实际应用中,我们总有需要某个线程等待另外一个线程的处理结果。当然,最简单粗暴的方法自然就是设置一个全局的bool ReadyFlag,在 ReadyFlag 状态发生变化是,线程进行处理。
但是这样做有比较明显的弊端,举个栗子来说明这个问题吧~
 1
 2
 3
 4
 5
 6
 7
 8
 9
10
11
12
13
14
15
16
|
bool ReadyFlag{False};


void thread1()
{
    …………//大段处理代码,需要一定时间。
    ReadyFlag = true; //满足条件,ReadyFlag状态变为true
}

void thread2()
{
    if(ReadyFlag)
    {
        …………//大段处理代码
    }
}
|
可以看到在thread1函数中,当我们处理大段代码时,thread2中一直针对目标条件进行轮询,这样会耗费大量的资源。
实际上,我们希望得到的效果是: thread1 在处理完大量操作后,ReadyFlag的状态改变,达到满足 thread2 的启动条件,然后 thread1 将thread2 进行唤醒。
这就是条件变量(Condition Variable)存在的意义。
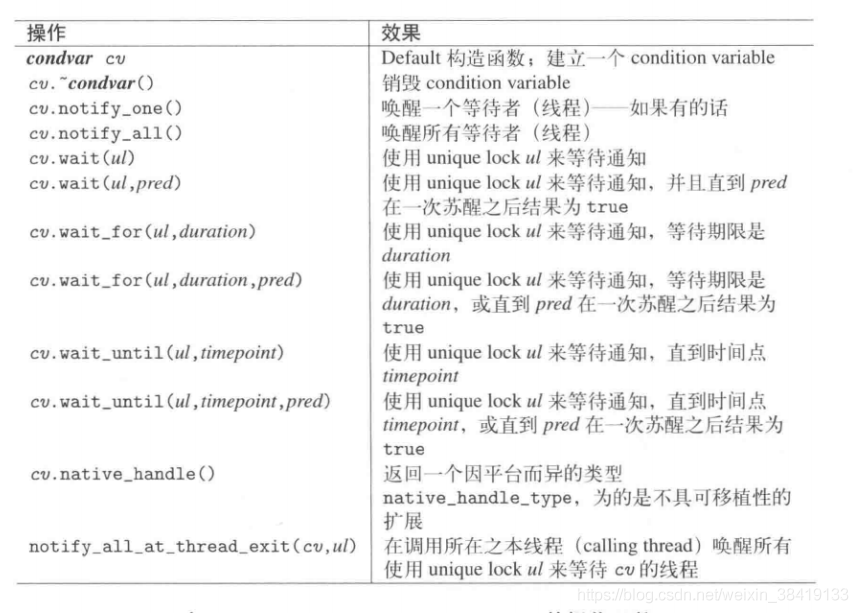
先来看一下Class Condition Variable的成员函数:
![https://cdn.jsdelivr.net/gh/xinqinew/pic@main/img/watermark,type_ZmFuZ3poZW5naGVpdGk,shadow_10,text_aHR0cHM6Ly9ibG9nLmNzZG4ubmV0L3dlaXhpbl8zODQxOTEzMw==,size_16,color_FFFFFF,t_70-20220428220010826.png https://cdn.jsdelivr.net/gh/xinqinew/pic@main/img/watermark,type_ZmFuZ3poZW5naGVpdGk,shadow_10,text_aHR0cHM6Ly9ibG9nLmNzZG4ubmV0L3dlaXhpbl8zODQxOTEzMw==,size_16,color_FFFFFF,t_70-20220428220010826.png]()
下面我们来看一个例子实际体会一下吧。
 1
 2
 3
 4
 5
 6
 7
 8
 9
10
11
12
13
14
15
16
17
18
19
20
21
22
23
24
25
26
27
28
29
30
31
32
33
34
35
36
37
|
#include <condition_variable>
#include <mutex>
#include <future>
#include <iostream>

bool readyFlag;
std::mutex readyMutex;
std::condition_variable readyCondVar;

void thread1()
{
	std::cout << "<Return>" << std::endl;
	std::cin.get();
	{
		std::lock_guard<std::mutex> lg(readyMutex);
		readyFlag = true;
	}
	readyCondVar.notify_one();//条件成立,唤醒等待者
}


void thread2()
{
	{
		std::unique_lock<std::mutex> ul(readyMutex);
		readyCondVar.wait(ul, [] {return readyFlag; });//等待条件变量的状态
	}

	std::cout << "Done!" << std::endl;
}

int main()
{
	auto f1 = std::async(std::launch::async, thread1);
	auto f2 = std::async(std::launch::async, thread2);
	return 0;
}
|
使用条件变量(Condition Variable)进行这样的线程之间的通信等待,就可以放弃轮询操作,节省CPU的资源和时间。
好的,到这里为止,我对于C++多线程的总结就做到这里吧~感觉写了很多了。但是实际上,这些都只是一些皮毛,只能教会我们如何去使用多线程,对于多线程的应用和各种问题(比如我们常听到的“死锁”问题等)都没有深入探究,这些等我以后有空了再来谈吧。各位,如果看到有啥错误的地方,也请大家都能指出来,共同进步~
此外,我还推荐大家有空想学习多线程的,可以去看看《C++标准库》(侯捷译)这本书,里面对多线程的调用有极为详细的讲解。谢谢大家,看到这里。


